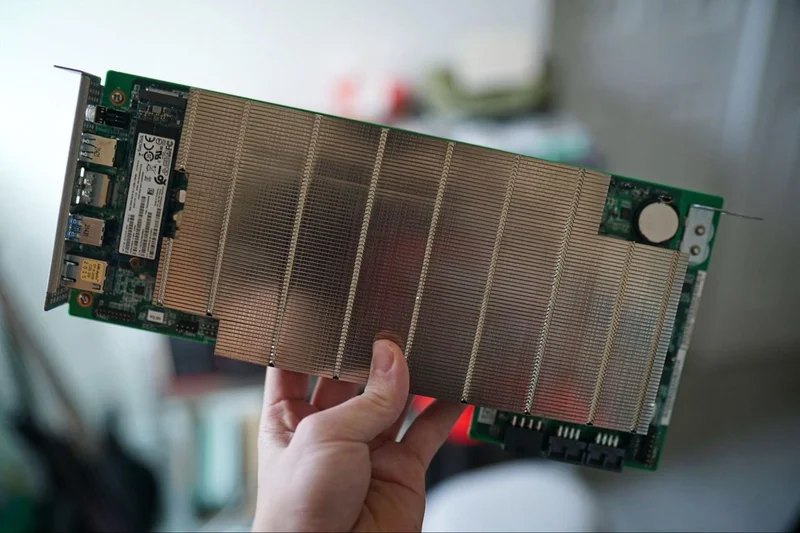
The AMD BC-250 has taken on a new life. It’s a PS5 APU that was repurposed for mining during the crypto boom, and now it’s being repurposed once again as a Linux gaming board. The BC-250 has seen some coverage in years past. It was originally a board you could pick up for less than $100, but now you’ll likely spend over $200 on one. We’re taking a closer look at the board and the performance it offers now for a few key reasons.
First, we have the Steam Machine. Valve’s long-awaited console-like PC is here and much more expensive than anyone expected at over $1,000. You can easily put together a BC-250 build for around $400 or $500, and even less if you have a power supply and SSD lying around. If you can get in the realm of Steam Machine performance for half the price (and the BC-250 can, based on our testing), that’s pretty compelling.
There have also been some significant developments among the BC-250 community. The board only works in the first place due to a community-developed BIOS and GPU driver, and developers have continued to experiment with what’s possible with the hardware. Now, there are tools that enable all 40 Compute Units (CUs) on the board (it defaults to 24 CUs), as well as tools to enable the two disabled Zen 2 cores, taking the six-core CPU to an eight-core CPU.
Now, the BC-250 isn’t a cut-down PS5 APU, at least from a hardware perspective. It actually patches two more graphics CUs compared to the PS5. Though, as should become clear throughout this story, relating the BC-250 to the PS5 on anything but the silicon on the board isn’t the best idea.
All in, we spent about $350 on the BC-250, with around $200 of that going toward the board (it’s currently listed for around $175 on eBay) and the additional budget going toward a 3D-printed case, fans, and a power supply. You could spend as little as the cost of the board if you can 3D print a case, bring your own fans, and repurpose an old PSU and NVMe SSD. If you’re starting from scratch, you’ll spend between $400 and $500.
Even for “full” price, the BC-250 is significantly cheaper than what you can get elsewhere. The PS5 digital edition is now $600, while the Pro will run you $900. The newly-released Steam Machine starts at $1,050, and that’s with just 512 GB of storage. The BC-250 is significantly cheaper and offers performance that can rival these platforms. What you save in money, however, you spend in time.
The BC-250 is a great project if you like tinkering, but it’s not a set-it-and-forget-it gaming device, even after the initial setup. After a few weeks of using the board, that much became clear.
A PS5 APU, not a PS5: BC-250 specifications
The BC-250 is described as a cut-down PS5 APU, and that’s exactly what it is, but the “cut-down” portion of the description carries a lot of weight. It comes with eight Zen 2 cores, but two of them are disabled, and a 40-CU RDNA 2 GPU, though only 24 of those CUs work out of the box.
The community has been able to unlock all 40 CUs with good success. Ultimately, your mileage with unlocking all 40 CUs will vary; some boards will work just fine with all 40, others with 32 or 36, and some with the base 24. As I’ll dig into more later, I was able to unlock all 40 CUs and run them stably up to 1,850 MHz, much higher than the recommended 1,500 MHz max frequency.
| CPU | 6 cores / 12 threads Zen 2 (two cores disabled) |
| CPU clock | ~3.5 GHz |
| GPU | 24 RDNA 2 CUs (16 CUs disabled) |
| GPU clock | 1,500 MHz |
| Memory | 16GB GGDR6 (shared) |
| Memory speed | 14 Gbps |
| Memory bus | 256-bit |
| Power | 1x PCIe 8-pin |
| Maximum power draw | 220W TDP |
| Storage | 1x M.2 2280 (PCIe 2.0 x2) |
| Fan headers | 2x 4-pin PWM |
| Ports | 1x DisplayPort 1.4, 2x USB 3.0, 2x USB 2.0, Gigabit Ethernet |
Out of the box, both the CPU and GPU run at locked frequencies of around 3.5 GHz and 1,500 MHz, respectively. You’ll need to separately install a GPU and CPU governor for dynamic frequency scaling (a necessity in the case of the GPU, though optional for the CPU). Achievable frequency on the CPU and GPU is entirely determined by your thermals. Both governors allow for overclocking, but the BC-250 is thermally constrained, even with active airflow, so don’t expect to push far beyond the stock frequency, particularly on the CPU.
Unfortunately, storage is a big bottleneck for the BC-250, and one of the biggest points of divergence compared to a PS5. The M.2 runs at just PCIe 2.0 x2 speeds, delivering about 1 GB/s of maximum performance with an NVMe SSD. The good news is that, due to how slow the interface is, you can save some money and get a less-performant but larger drive for storage.
As of a few days ago, at the time of writing, some initial fixes to unlock the extra two CPU cores have rolled out, which I was able to get working after a bit of trial and error. Outside of the GPU and CPU, the BC-250 has a bit less L3 cache. The APU, from a hardware perspective, is very similar to the PS5. Though that ignores the complex I/O system present in the PS5, not to mention the various layers of software that Sony runs on the APU.
Given that the BC-250 wasn’t designed for gaming, it’s important to keep that context in mind. You could just as easily describe it as a crypto mining board that’s been repurposed for gaming as you could a PS5 APU that’s been repurposed for mining. The BC-250 is a mining board, and the only reason it works is due to a large number of enthusiasts trying to get the damn thing to work and sharing their advancements along the way.
Although Linux gaming broadly has made a ton of advancements over the past few years, the BC-250 has unique hurdles you need to overcome. It needs fixes to scale the frequency on both the CPU and GPU; otherwise, it’s locked at a fixed frequency. It needs a custom BIOS image to even boot, and a specific configuration in the BIOS to avoid immediately crashing. Those are all steps you need to take to get the BC-250 to work in the first place, let alone start optimizing it to squeeze out the best performance.
There is extensive community documentation for the BC-250, which I referenced ad nauseam throughout this process. It’s an excellent resource, but even still, I had to search out solutions outside of the documentation. This is cobbled together from community fixes, and the documentation seeks to cover as many distros as possible. But it’s nigh impossible to have complete documentation on the BC-250, as valiant as the effort linked above is.
Expect a bumpy (but rewarding) road. It’s better to think of the BC-250 as a project, rather than a commodity like the PS5. Yes, you can play games on it and get surprisingly good performance, but you’ll spend a good amount of time simply tinkering with the machine, at first to get it to work, and later to optimize it. And you will inevitably run up against games that either don’t work or have poor performance, prompting another investigation and optimization cycle. I find the process rewarding; others will find it frustrating.
Setting up and configuring the BC-250
Getting the BC-250 is only one part of the process here. At the least, you need a power supply that can deliver at least 20A on the 12V rail. A standard PSU will work, but FlexATX power supplies are a better fit. I ended up purchasing a 3D-printed case, along with a power supply, from eBay. The BC-250 documentation includes several PSU recommendations, along with case designs, if you want to go about choosing your parts piecemeal.
Here’s what I’d recommend at minimum:
- BC-250
- 300W+ PSU (at least 20A on 12V rail)
- 2x Arctic P12 high-pressure fans (if using CU unlock)
Regardless of the route you choose, double-check fan mounting points (there aren’t any mounts on the BC-250 itself) and case/PSU compatibility. Many small form factor BC-250 designs you can 3D print are designed around a FlexATX PSU. Before booting, verify your 8-pin pinout against the community documentation. If the 12V pins are in the wrong position, you can fry your board.
With the board ready, the first step is to flash a new BIOS from the shell. It’s straightforward enough, though without the modern conveniences of firmware flashback in the event of a failure. If you lose power, you’ll brick your board and need a hardware controller to reset it, so I recommend connecting to a UPS during the flashing process. You can grab the correct files from the documentation.
From there, you need to clear your CMOS by removing the battery and configure a few BIOS options to force the integrated graphics, set the UMA frame buffer size, and disable IOMMU. From there, you need to choose which Linux distro you’re going to use, which is very important. I’d recommend experimenting with a few different distros, especially if you’re new to Linux.
For gaming, the go-to options are Bazzite and CachyOS, the former of which I originally went with. There are some “optimized” images floating around for the BC-250 that supposedly rope in all of the configuration and fixes you need into a fresh OS image. I wouldn’t recommend using those. Setting up the BC-250 is getting easier by the day (I have found new fixes and scripts that automate installing several fixes just in the time I’ve been testing the board), so these optimized images are, at best, out of date, and at worst, not actually optimized at all. Tread carefully.
You don’t need an optimized image because, at least for Bazzite and CachyOS, scripts exist that can automate the entire setup process. Strictly speaking, the only thing you need is the GPU governor. Previously, you would need a kernel patch, but a GPU governor via an SMU now exists and is what I used. The governor is what allows dynamic frequency scaling on the GPU, as well as overclocking.
You’ll also need a compatible kernel, which is easier to manage on rolling distros like CachyOS. 6.18.18 LTS is the recommended kernel at the time of writing, but 6.17.11+ works, along with 6.12.x to 6.14.x LTS. Other kernels may work, though some (such as 6.15.0) are broken and will trigger a kernel panic.
With your distro chosen and a correct kernel working, here are the optimization steps I took:
- Install GPU and CPU governor
- Unlock 40 CUs
- Setup Zswap with 32GB swap page
- Install ACPI fix
- Configure PWM sensors
Again, scripts exist for these patches, the most critical of which don’t even require kernel patching any longer. The exact fixes you need and the method to install them will depend on the distro you choose, however, so make sure to keep the setup documentation handy.
The list above is in order of importance. Once you have the GPU governor, the next step is to try to enable the full GPU. Previously, you would need a kernel patch, but the bc250-cu-live-manager utility can enable the CUs via a User Mode Register (UMR) without the need for a kernel patch. Not only is this easier to do, but it also persists across updates, unlike a kernel patch, where new kernels will force you to go through the unlock process again. The end result is identical regardless of the path you choose.
I spent a good deal of time testing the 40 CUs before doing any other optimizations, and I’d recommend you do the same. Just because the board has 40 CUs doesn’t mean you can use all of them. I was able to unlock all 40, though not at the frequencies some others have reported. And some users aren’t able to use all 40, rooting out bad clusters for a 32-CU or 36-CU configuration. Overclocking-like trial and error is necessary here, though, as we’ll get to in the performance section later, experimenting is worth the hassle. Using all 40 CUs, even at suboptimal clock speeds, offers much better performance.
Although setting everything up on Bazzite should be easy, I ran into issues numerous times. It’s an immutable OS image, which can cause problems depending on the fixes you’re trying to apply. It’s a great choice if you want to quickly set up the BC-250, but it became clear that an immutable image isn’t optimal if you want to get the best performance. Further, some newer fixes simply wouldn’t work, such as unlocking the extra two CPU cores.
The CachyOS pivot
After a few days of optimizing, testing, and troubleshooting Bazzite, I made the hard decision to wipe the machine and start fresh with CachyOS. In hindsight, I should have started with CachyOS from the beginning for numerous reasons, but mainly because it’s a rolling Arch-based distro. Bazzite is a Fedora Atomic-based distro. It’s immutable, adding guardrails to make it difficult to break anything, but in the process, making it much more difficult to apply low-level changes like kernel patches.
If you’re not familiar with Linux and don’t care to become familiar, Bazzite is your best bet. It’s convenient, and it includes a ton of small community fixes right in the startup menu, such as the LSFG-VK project for Lossless Scaling. It became clear, however, that you’re trading performance for convenience with Bazzite. CachyOS is more hands-on, but it’s much easier to actually accomplish what you need to with the BC-250.
Most notably, CachyOS (and other rolling release distros) allow you to easily manage your kernel. There are alternative methods for critical setup items like the GPU governor and CU unlock that don’t require a kernel patch. However, having the ability to easily patch your kernel helps when you run up against compatibility or performance issues, allowing you to try alternative installation methods or community fixes.
Further, CachyOS has access to yay, or Yet Another Yogurt, the simple command-line call to search and install packages from the Arch User Repository (AUR). It takes some time getting used to living in the command line as often as you do on any Arch-based distro. But even knowing just a few basic commands allows you to accomplish what you want much faster than fumbling around with flatpaks, at least in my experience.
Getting set back up was simple thanks to a community script that automates nearly all of the configuration and optimization for the BC-250. The BC250-Toolkit script brings together all of the various community patches, including optional optimizations, and it just worked. Coming off of Bazzite, it was a treat to run up against the immutable walls of the distro. I was able to accomplish in a few hours what took me more than a day with Bazzite.
CachyOS specifically has a few optimizations for gaming, as well. First, there’s the BORE, or Burst-Oriented Response Enhancer, scheduler that, as the name implies, is optimized for bursty workloads (Michael Larabel over at Phoronix has a great writeup on that). CachyOS also includes packages for x86-64 v3 and v4, the latter of which is relevant to the BC-250.
These optimizations represent a substantial performance improvement. In Forza Horizon 6, for example, I went from 61 FPS at 4K with the Low preset to 72 FPS on CachyOS after it was configured properly (with 40 CUs in both cases). In Cyberpunk 2077, I went from 74.7 FPS on Bazzite to 82.2 FPS at 1080p with the Steam Deck preset, and perhaps more impressively, from 47.8 FPS to 56.5 FPS at 1440p.
I saw higher peak performance on Bazzite in Unigine Superposition, though that’s likely due to more thermal headroom for the GPU, as I wasn’t able to enable the extra CPU cores on Bazzite. I mainly wanted to show this chart to bring the “optimized” Bazzite image into the fold, which was supposedly an image that was already configured for the BC-250. Using a script to automate the installation of several tools (like the one available for CachyOS) is one thing. Using an entirely custom image is another. I’d suggest starting with a clean, official image regardless of the distro you choose.
Testing performance on the BC-250
The best touchstone for comparisons with the BC-250 is the Steam Machine. The Steam Machine is more powerful simply based on the spec sheet. I ran a truncated list of benchmarks to see how the BC-250 stacks up, as well as several additional benchmarks on the BC-250 alone. Performance here is tough to compare fairly. Even just with CachyOS and Bazzite above, we see large performance differences. And, as will become clear in this section, there were numerous tests that either showed performance issues inconsistently or simply failed to run at all.
Our best point of comparison between the Steam Machine and BC-250 comes in Cyberpunk 2077. Neither machine is capable of achieving a playable frame rate at 4K, but the fully-optimized BC-250 is just 6.7% behind at 1440p. At 1080p, however, the performance drop is 16.1%, exposing perhaps the biggest performance issue with the BC-250.
Forza Horizon 6 also highlights this issue; the CPU in the BC-250 is very weak. It’s not only weak because it’s using the aging Zen 2 architecture, but it also has only six cores (or eight, if you can enable them). It’s such a hurdle because the clock speed is severely limited to just 3.5 GHz, the same as the PS5. We are completely CPU-bound at 1080p and even 1440p in Forza Horizon 6, and then miraculously, at 4K, the larger GPU of the BC-250 is able to take over and actually beat the Steam Machine.
A system so hamstrung by the CPU makes sense in the context of a console. Sony has a performance target, and it makes sense to opt for a weaker CPU and a more powerful GPU. The CPU can reach that performance target. But in the context of a PC where you’re given more options, resolutions, and performance-enhancing features, the limitation of the CPU becomes clear. There’s an obvious performance wall you’ll run into with the BC-250 that no amount of tweaking can solve.
For a clear view of the CPU limitation here, look at the Forza Horizon 6 benchmark above. Running at 1080p with Low graphics is going to induce a CPU bottleneck in most systems, but the gap between GPU render performance and CPU render performance here is massive. According to the game’s benchmark, we were bottlenecked by the CPU entirely throughout the run.
Even at 4K, you can see that the CPU is still a significant influence on performance in this game, showcasing just how unbalanced this system is. Again, that imbalance makes sense for the PS5, but it’s a critical caveat with the BC-250.
In the gallery above, you can browse our other comparative results to get an idea where the BC-250 lands. I’m going to move past comparisons and look at the BC-250 in isolation. An apples-to-apples comparison really isn’t possible (nor fair) with the BC-250. That’s not only due to the wide performance window depending on your specific board and software stack, but also the clear performance limitations of the BC-250 that require certain workloads that wouldn’t make sense with other machines.
Chief among those limitations is VRAM, and memory in general. You have just 16 GB of GDDR6 for the whole system, which is much less of an issue on the PS5 where there’s careful memory management. As you can see in the chart above, I don’t have 4K results for Spider-Man 2 or Doom: The Dark Ages, and that’s due to a lack of VRAM.
In both cases, the games crashed at 4K, but worse, they wouldn’t start back up. I made the mistake of flipping to 4K before turning FSR on, which locked me out of starting the game until I manually edited the settings file prior to launch. 4K is possible on the BC-250, though it has a very narrow performance window considering the VRAM limitations and CPU performance.
Although FSR Performance mode is ideal for 4K (50% scaling, 1080p input resolution), I opted for Balanced to avoid the CPU bottleneck we can see present in other games (you can even see it here in some games, such as Spider-Man 2). However, turning up the input resolution also puts a greater strain on VRAM. You’ll need time and patience to experiment with these more demanding titles to find the ideal balance of settings on the BC-250; of course, if you’re just playing Silksong, none of this matters much.
The VRAM limitation is also relevant for frame generation. With such a narrow memory footprint, you’ll struggle to use frame generation at 4K if you’re already pushing the VRAM to its limits (those buffered frames need to live somewhere). Thankfully, Lossless Scaling is an option on Linux with LSFG-VK, which doesn’t strain your VRAM like in-engine tools.
An important aspect of performance with the BC-250 is cooling. Most governor profiles cap temperature at 80 degrees for multiple reasons. First, the heatsink of the BC-250 is closed on top. You can sit and rip apart the top of the heatsink for direct airflow with a pair of tweezers, but I left the heatsink on my board intact for now, using two Arctic P12 fans to assist with cooling.
Cooling is all the more important with the 40CU unlock and enabling the extra two Zen 2 cores. Stress-testing in Furmark over a 20-minute run, you can see how quickly the GPU throttles from 1,850 MHz back down to 1,500 MHz as it reaches the temperature cap of 80 degrees.
Remember, however, that Furmark is a stress test. I wasn’t thermal throttling in games, with the CPU and GPU settling around 70 degrees in Doom: The Dark Ages. I’ve included CPU and GPU power in the chart above, as well, and you can see that, combined, they rarely poked over 100W. Keep in mind that we’re exclusively looking at GPU and CPU power here, not whole system power. Whole system power can peak above 225W.
The stock heatsink and dual Arctic P12S do a good job keeping the BC-250 chugging along, even with all of the silicon unlocked and a moderate overclock on the GPU. However, Furmark makes it clear that this current iteration of the system can’t sustain its performance over long periods of time. It would take longer for that drop to show up in the most demanding games, unlike in Furmark, where we can see the drop in just 20 minutes. But I plan on revisiting the cooling solution in this BC-250 build. Maybe I can even raise the temperature limit closer to the 100-degree TJmax.
The bad and the ugly of BC-250 gaming
Although the BC-250 offers compelling performance for the price, I’d be remiss if I didn’t highlight the numerous quirks I ran into while testing. There are performance issues and limitations with the board that you can explain with hardware, and further compatibility issues that you can explain away with Linux. Then, there’s everything else: the weird bugs, quirks, and oddities that pop up when running a largely community-developed software stack on unofficial hardware that wasn’t built for this purpose.
The above image of Resident Evil 9 is a microcosm of what I’m talking about. The RE Engine is remarkably scalable, and that was on full display with my BC-250 testing. Requiem offered excellent performance, even all the way up to 4K. It didn’t feel like I was compromising much of anything with the BC-250. But then I turned on the “hair strands” setting, and the result is what you can see above.
No, it’s not due to the CU unlock, any overclock, or even the overlay you can see. It’s just something with this set of hardware, this software stack, and the hair strands setting in *Resident Evil Requiem. *
Similarly, in Doom: The Dark Ages, any resolution change I would apply necessitated a restart of the game. Otherwise, I’d get the ghostly streaking you can see in the image above. On one of these reboots, the game suddenly stopped rendering reflective surfaces, resulting in the strange black voids you can see below.
This isn’t a criticism of the BC-250, and certainly not of the remarkable work of the passionate developers and enthusiasts who’ve created fixes and workarounds for the hardware. The fact that this board boots at all and runs games is a minor miracle. The context of what the board is, however, is important.
You will, inevitably, run into strange issues that aren’t documented anywhere. These are two examples, but I also ran into strange problems elsewhere. The widely used MangoHUD overlay, for example, didn’t pull in my GPU’s clock speed correctly after an update, even after ensuring I applied the community fix through the GPU governor to map the reporting correctly. And once you add external devices, compatibility gets even more complex. The board doesn’t have Bluetooth or Wi-Fi, for example, and an external adapter should work (this UGreen Wi-Fi 6 adapter I purchased does), but it’s just as likely that a driver for another adapter doesn’t work or isn’t available.
I don’t have an issue with these quirks, but the BC-250 also isn’t my primary gaming machine. You should just be aware of them. And, if you’re going to invest in a BC-250 build of your own, be ready to encounter some strange issues that you might not be able to easily troubleshoot.
What’s next?
The BC-250 is a project, and like any good project, it isn’t done here. Now that I’ve messed around with the configuration, tried out different distros, got the critical mods working, and measured performance, I want to actually use the BC-250 long-term. Maybe I can find some additional optimization steps I can take, or workarounds for some of the strange issues that I noticed during testing. Regardless of what it is, I’m confident that I’ll mess around with the BC-250 more outside of just playing games on it.
My clear next step is to work on cooling. I kept things conservative here in order to get valid data in a timely manner, but I want to dig deeper into what I can do on the thermal front, not only to raise the temperature limit, but also to push the GPU overclock further. That may involve some CU tinkering, as well; if I can get similar performance at 36 CUs and better thermal headroom, I may be able to push higher overall performance.